Streamlit and GPT-4: Is Building a Simple Chatbot Really that Easy?
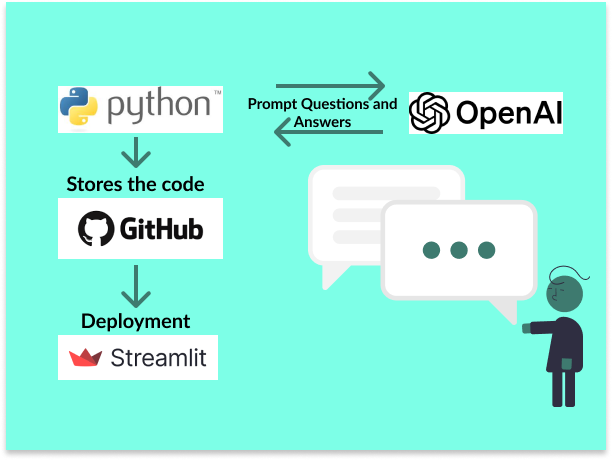
I created a simple chatbot with Streamlit that uses the generative AI model GPT-4. Streamlit is an open-source framework that allows you to quickly and easily create interactive web applications.
In the last article, I showed you how you can create a simple data visualization app with Streamlit in a short time. In this article, I have looked at how you can create Gen AI apps with Streamlit. I created a simple chatbot with Streamlit that uses the generative AI model GPT-4. If you haven’t read the last article, Streamlit is an open-source framework that allows you to quickly and easily create interactive web applications for data science and machine learning applications. Of course, it is not intended for super complex and customized applications, for which you are better off using one of the Python frameworks Flash or Dash.

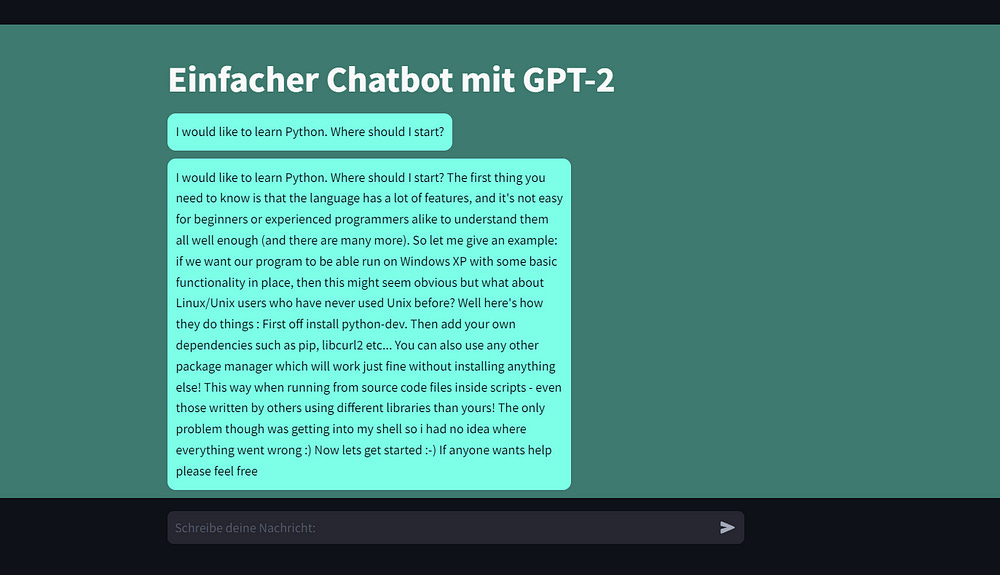
Despite its apparent simplicity, the process requires more technical knowledge than one might initially expect. In addition to API integration, aspects such as the secure storage of the API key play an important role. Even though GPT-4 offers powerful functions, there are obstacles such as the cost structure, as the use of the model via the API always requires credits. This can be an obstacle for developers who have limited resources. As an alternative, I tried using open-source models like GPT-2, but they have clear limitations in terms of response quality. Check it out for yourself.
Step-by-step instructions for creating a Streamlit chatbot based on GPT-4
If you don’t want to create an account on the OpenAI-API platform or don’t have credits, you can use pre-trained open-source models on Hugging Face like GPT-2 or those models from EleutherAI like GPT-Neo or GPT-J. You can find a code example for GPT-2 on my GitHub profile.
OpenAI does not offer free access via the API — you need credits for GPT-3.5 or GPT-4. In some cases, there is a small starting credit to test the API.
1 — Install the necessary libraries or add them to requirements.txt
The first step is to install the necessary libraries for this chatbot. Since we are deploying the app in the Streamlit Cloud, you can save all the necessary libraries in a requirements.txt file. Streamlit opens this file during deployment and automatically installs streamlit and openai.
If you want to run the app locally first, you must install the Streamlit and OpenAI library using ‘pip install’. It is best to do this in an environment that you have created specifically for this app so that no dependency errors occur between installed packages. After activating the environment, you can install the libraries. If you are still at the very beginning of your Python journey and you don’t know why you should create a specific environment, I recommend this article Python Data Analysis Ecosystem — A Beginner’s Roadmap.
2 — Create Python file for the Streamlit app
Next, we create the basic framework for the Streamlit app. To do this, create a Python file ‘chatbot.py’. We use this code to initialize the chat application and to preserve the chat history.
#Importing the libraries
import streamlit as st
from openai import OpenAI

#Setting the API key of OpenAI (see step 4 & 5 below)
client = OpenAI(api_key=st.secrets["OPENAI_API_KEY"])

st.title("Einfacher Chatbot - Wie kann ich helfen?")

#Initializing the chat history if it doesn't already exist
if "messages" not in st.session_state:
    st.session_state.messages = []

#Showing the chat history
for message in st.session_state.messages:
    with st.chat_message(message["role"]):
        st.markdown(message["content"])
First we import the necessary libraries streamlit and openai. Then we define the API key of OpenAI. This ensures that only authorized users can access the GPT model. With ‘st-secrets’ we access the API key that is stored in the Streamlit secrets (see steps 4 & 5 below). We then set a title for the app. We use the if condition to check whether there is already a message history. If not, an empty list is created that saves all previous messages. With the for loop, the message history is run through and each message is displayed.
3 — User input and display of the response
Next, we add the code to the ‘chatbot.py’ file that prompts the user to enter a text and integrates the chatbot’s response into the chat history:
#...code from step 2

#Responding to the user's input
if prompt := st.chat_input("Schreibe deine Nachricht:"):
    # Showing the user message
    st.session_state.messages.append({"role": "user", "content": prompt})
    with st.chat_message("user"):
        st.markdown(prompt)

    # Sending the input to GPT-3.5-turbo and receiving the response
    #response = client.chat.completions.create(
    #    model="gpt-3.5-turbo",
    #    messages=[
    #        {"role": "system", "content": "Du bist ein hilfsbereiter Chatbot."},
    #        {"role": "user", "content": prompt}
    #    ]
    #)

    #Sending the input to GPT-4 and receiving the response
    response = client.chat.completions.create(
        model="gpt-4",
        messages=[
            {"role": "system", "content": "Du bist ein hilfsbereiter Chatbot."},
            {"role": "user", "content": prompt}
        ]
    )

    #Showing the response of the chatbot
    bot_message = response.choices[0].message.content
    st.session_state.messages.append({"role": "assistant", "content": bot_message})
    with st.chat_message("assistant"):
        st.markdown(bot_message)
We use the If condition to ask the user for an input. As soon as the user enters something in the input field, this is saved in the code as ‘prompt’. With ‘st.session_state.messages.append()’ we save the user’s input in the message history and with ‘with st.chat_message(“user”): st.markdown(prompt)’ the message is displayed on the website.
We then send the user’s message to the GPT model (4 or 3.5) of OpenAI. The GPT model processes this input and generates a response. With the last code part, the generated response is saved in the message history — this time with the role ‘assistant’ = the chatbot.
4 — Create an API key on OpenAI
You should never specify an API key in your code. Storing your API key in environment variables, such as .env files locally (see step Alternative) or through Streamlit Secrets (see step 5) during deployment, ensures the security of your keys and prevents them from being exposed in your source code.
Visit first the OpenAI API platform to create an API key. Here you need to define the permissions on how the API key can be used to access your ChatGPT account. For a chatbot, you need the authorization All, or, which is more secure, Restricted.
Once you have your key, you need to save it securely. Copy the key before you leave the page, as the key is only displayed once.
5 — Deployment of the app on Streamlit Cloud (linked to GitHub)
First, create a new repository on GitHub and upload your chatbot.py file and your requireemts.txt file from step 1 to your repository.
Then you can create an account on Streamlit Community Cloud. It is best to log in with your GitHub account so that Streamlit is directly linked to your GitHub repositories. You can then create a new app in Streamlit and select the previously created GitHub repository.
You can save your API key under Secrets in the Advanced Settings. If you have already created the app without changing the Advanced Settings, you can select ‘Manage App’ at the bottom right and save your API key in the Secrets.
You can now open and use your app on Streamlit.
Alternative — Start the Streamlit chatbot app locally
If you want to start the app locally with ‘streamlit run’, you must save your API key in an .env file. To do this, save the code ‘OPENAI_API_KEY=your-api-key’ in your .env file. In addition, you must install python-dotenv in your Python environment and load the API key in your chatbot.py file first by adding the code below.
import os
from dotenv import load_dotenv

# Load environment variables from .env file
load_dotenv()
You can then use the API key in your chatbot.py file and you can run the app.
openai.api_key = openai_api_keyIf you do upload the files to GitHub, it is best to add the .env file to your .gitignore file so that this file is not uploaded to your repository.
Creating a chatbot with Streamlit and GPT-4 — is it really that easy?
The code for the chatbot may seem simple at first glance and can be created relatively quickly. However, there is more to developing a functional chatbot than it first appears. Streamlit and GPT-4 are accessible tools, but the process does require some technical knowledge about API integration, setting up a development environment and security aspects, such as securely storing the API key.
In addition, using GPT-4 via an API is always tied to credits, which can be an obstacle for some developers. When I tried to use GPT-2 as a free alternative, it quickly became clear that the quality of the responses was nowhere near the level of GPT-4. Although the chatbot was technically feasible and usable, the generated answers were often not very helpful. It would be interesting to test other open-source models such as GPT-J or GPT-Neo to find out whether they can deliver better results.

Final Thoughts
To create a simple chatbot with Streamlit that accesses GPT-4 from OpenAI, we already have to take several steps and think about how we can securely store the API key. It is also somewhat unfavorable that you can only use OpenAI’s GPT-4 model with credits. That’s why I created a version with GPT-2, which you can find in my GitHub repository. As soon as you open the app, you will see the problem with GPT-2. Compared to GPT-4, it is significantly less powerful and often does not give you useful answers.
References and used tools


